Monday 10 December 2012

Spiral Christmas Hanging


I've been away for a while, doing lots including making Christmas gifts and working on the Never Ending Baby Blanket.


Well, this morning I decided that my dining room needed an extra bit of decoration, and as I had a few spare baubles I decided to make a hanging decoration to go in the centre of the ceiling. I also remembered to take some photos to help you to be able to make your own if you want to!


My was very low cost as I used the lid from a recycled pizza box, a spare scrap of wrapping paper, some fishing wire from my craft box and the spare baubles that wouldn't fit on this year's tree.


Gather your supplies

Using a plate as a guide, cut your circle out

Wrap your circle with paper

Using a sewing needle, thread your wire through
the circle in your desired pattern.
I used an inward spiral shape for mine.
Secure on the uncovered side with tape.
Remember to increase the length of your wire for each bauble!

Tie your baubles on to the other end of the wire,
and hang in location!


Wednesday 28 November 2012

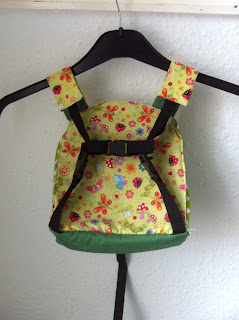
Backpack with built in reigns

I haven't had a lot of time lately to finish anything worth showing to you. My free time has been spent working on the Never Ending Baby Blanket and a tea cosy for my mother and father-in-law, which I will do a whole post on when it is finished.

Today, I have decided to share with you a little backpack and reigns combination that I made for my 2.5 year old. I wanted to make him something that he would be willing to wear, as well as solve the problem of him running away now that he is no longer in a pushchair.

To start with, I drew up a pattern and cut out all the pieces from thin craft foam sheets. I had them handy, I wasn't using them for anything else and they were perfect to give the little backpack a lot of stability. I then used those foam pieces to cut out the fabric, added some webbing straps and a few buckles from an old broken backpack belonging to my husband, and voila! 


I incorporated a little chest strap and buckle to stop the little so-and-so from being able to slip free of his bag.


I made this a few weeks ago. It fit perfectly and looked so cute when he put it on. The only problem is that the little tyke won't actually wear it outside of the house. Which, of course, defeats the whole point of the design! 

Sunday 25 November 2012

A little help for a 4 year old

Alphabet Practice Sheets

Last week we had our 4 year old son's first ever Parent's Evening. To say that we came away as proud-as-punch would be an understatement. His teacher was brimming with enthusiasm about our firstborn. I'm smiling just thinking about it!

It was such a relief to hear that he was a model pupil - considering he is like a stroppy teenager at home! Don't get me wrong, he is also very loving and considerate - just not all the time. Apparently at school he is quiet and sensible, something which came as a bit of a shock to hear as he tends to tear his way around our home like a runaway steam train.

There was just one area where he is not doing so good; writing legible letters. Mind you neither is he behind, he's simple not as advanced as he is in other areas. I know he can write, we've got examples stuck all over the kitchen wall; he just refuses to play the part of a performing monkey when asked to display his skills.

So, I have decided that I will try and help him to enjoy writing. I have designed some handwriting practice sheets in the hopes that he'll get a kick out of filling the page and getting a sticker as a reward when he finishes. You never know, right?

Feel free to help yourself to the practice sheets too!

The desire to download an App was overwhelming, but there really are some instances where technological advances really do play second fiddle to good ol' pen and paper.


Saturday 24 November 2012

Another design: My iPad case


I feel like I'm on a bit of a roll at the moment with regards to my sewing machine. In reality it's pure procrastination and avoidance of the Never Ending Baby Blanket, but it's inadvertently and unavoidably productive too!


It was confirmed on Wednesday that my new iPad would be delivered on Friday (yesterday). In anticipation of its arrival I hit my local fabric shop for something cool and funky to house my new toy. I was very pleased when I dug out this fat quarter from amongst hoards of varying fabric designs. It's not my usual style but I felt a need to leave my comfort zone for once and I love the multi-colours.


For another night this week (it's getting to be a habit now) I grabbed the laptop and started designing a pattern from scratch. I have so many ideas in my head but no idea how to transfer them to something that would actually be possible to make. The technical side of design eludes me, I find it difficult to deconstruct my idea into its rawest form. It's a little bit like taking a fully cooked meal and trying to turn it back into its original, separate ingredients -not possible! I am in awe of people that can design things, anything, and make it possible for other people to be able to follow their pattern to produce the desired item.

Anyway, as I was saying - I can't do it! I spent the entire evening drafting out ideas and yet I couldn't get it to pull together into what I wanted. Perhaps I over-think things. I haven't quite managed to make a pattern that would be usable to anybody else, but as soon as I do then I will make it available on this blog.

Well... here is what I ended up with. What do you think?


I have incorporated a PVC pocket within the case so that I can simply unfold and use, without removing the iPad. As you can see from the centre picture, there is also a gap in the side seam so that I can charge my iPad whilst keeping it safely stored in it's case. The PVC hardly effects the sensitivity of the screen and protects it from little fingers and nasty scratches.

I'm very pleased with it, even if the sewing does leave a bit to be desired.

Next on my agenda is a knitted carry bag, but that will have to wait a while as I have a lot of Christmas gifts to make!

Friday 23 November 2012

And the Christmas gifts keep on coming


This is a really simple but nice idea to make for a couple. It's definitely something that could be churned out in a free hour. 

I found the frame in Poundland, the felt was in my stash, as was the yarn. The idea was actually my husband's, so I had best give him the credit for it! 

To my surprise when I took the frame apart to trace the shapes I found that the glass was real glass. I had expected plastic in such a cheap frame. It's definitely a bonus having real glass though as it makes it seem like a more expensive frame.

Using my trusty new laptop-lightbox method, I selected the font I wanted to use and enlarged it on the screen to just the right size before then placing my felt over it and tracing with a pencil. The sewing itself is done using stem stitch - which, by the way, I am loving. Apologies for the poor picture, but you should be able to get the idea!


I have added embroidery hoops to my own Christmas list as I have caught the embroidery bug.


On a slightly different note, the iPad case that I promised won't quite be ready for its first public appearance until tomorrow as I haven't had time to cut the fabric yet. I promise though that tomorrow's post will be about it, one way or another. That is to say that it'll either be a "wow, look what I made" post or a "oh no, it didn't quite work out" post. Either way, I will stick up some pictures for you to admire or laugh at.

Thursday 22 November 2012

Chelsey's Bag; the unveiling

Ladies and gentlemen, I present to you my very first sewing pattern Chelsey's Bag. Do with it what you wish, but please do not sell the pattern itself!

Chelsey's Bag consists of a hand and machine stitched felt exterior shell teamed with a machine stitched (although you could hand stitch) cotton interior lining. It is adorned with a pretty little bow and some minor embroidery work. In fact it is my very first attempt at embroidery ever! 

The intended recipient of this particular bag is a very girly little 5 year old but I am sure you could embellish your bag in a more adult fashion if you so wished, perhaps even using alternative fabrics as well.

I am also proud to be able to offer the pattern, completely free of charge for anybody that would like to give this a go. Please let me know how you get on as so far I am the only person to test the pattern, and I would appreciate any feedback that you have.

Might I add that I am so insanely proud of my first attempt at embroidery. I used stem stitch in order to create a lovely "C". I also found a really simple way to trace the letter on to the felt. I simply enlarged it on my laptop screen until it was the actual size that I need, then I positioned the felt directly onto the screen and traced with a pencil as though I were using a lightbox!!


After having such success with the initial, I decided to embellish the handle with a couple of stem stitch parallel lines, and then edged around the flap with the same stitch.

I plan to stuff the bag with some hair accessories and give it to my niece as a Christmas gift.

Yummy scones, thank you James Martin.

Yesterday I made these irresistible scones. My husband knows that if he wants baked treats then he has to work for them. In this case, I was short on eggs for the recipe so off to Tesco he did go!

Thanks to James Martin's scrummy recipe, we have these tasty little numbers to eat our way through over the next couple of days (if they last that long, they really are good!).


I've taken the liberty of including my own pictures as a guide to what the dough should look like after each stage of the recipe, although James' instructions are perfectly fine on their own.


Sieve the bread flour and baking powder into a bowl


Use your fingers to rub the butter into the flour


Stir in the sugar and beaten eggs


Use a wooden spoon to mix in the milk and bring the dough together


Roll, cut, turn and place on a baking sheet, brush with egg yolk


Bake for 10-12 minutes and then place on a rack to cool for a couple of minutes before serving warm with whatever you fancy adding to them!


Wednesday 21 November 2012

Chelsey's Bag; my first fairy step into pattern design


I've started my venture into the world of pattern design with more of a half hop than a leap, but here it is - Chelsey's Bag. I'll admit that I have played it rather safe; felt with a cotton lining and a little bead work. I'm quite proud of it though!

I drew up the design and turned it into a PDF last night, perhaps a little presumptious since at that point I had no real clue as to whether or not the design would work in reality. So far today I have stitched the lining together and already I have found my first error. The side panels were too long, but after a quick trip back to the drawing board - well, the laptop - they have been amended and now fit perfectly.

This morning, in between children and housework, the felt and cotton have all been cut to size. Thanks to the unusually compliant little people, I have also managed to sew together the lining for the bag. As an added bonus I even remembered to take some pictures of the process so that I can publish the pattern and some sort of tutorial when I've finished.

Look! I'm sewing and it's going to plan. :-)


Tilly didn't approve of today's activities though and did her best to try to sabotage my work with her wet paws! I managed to flick my precious bag liner out of her way just as she was about to position her rather soggy behind on it. What it is about cats and their need to sit on your work-in-progress?


Here's hoping that I will be able to return to you tomorrow with pictures of a completed bag, and perhaps even a pattern ready and waiting for you to try out.


Tuesday 20 November 2012

A little sew (and sew)...

This is definitely one of the quickest things I have endeavoured to make lately. Now, I am the first to admit that I am no master seamstress. In fact, truth be told, I barely know my way around a sewing machine despite my best efforts. I certainly couldn't tell you what the drawfull of sewing feet are used for, and it took me a good hour to figure out how to thread the bobbin! In my defence, it is an old hand-me-down machine with no manual.

So, while hubby had snatched all three children from under my nose to allow me some peace (a rare thing in a house with three children under five), I decided that I would make myself a new phone case. Ooh, and meet Tilly. I think she has sights on being a better seamstress than me. Let's be fair though, it wouldn't take much!

I found this lovely pattern and tutorial via a nice little collection of things to make with fat quarters, grabbed my bits and pieces and headed to the machine.

Me being me, I was lacking in the necessary parts to actually complete the task, but was satisfied with the alternative that I found in my craft box. As you can see, I was missing the batting and fusible interfacing, however it was nothing that a thin piece of felt couldn't fix!


It doesn't look too bad from those pictures. There is only one problem... my iPhone doesn't actually fit inside it. I am 100% certain that the pattern is accurate; it seems from comments on the page that other people have had no difficulty with it. What is at play here is the evil of "lack of skills". 

One day soon I will make something that turns out as planned!!


On a more positive note, my mum popped over for a coffee and a slice of the brownie that I made yesterday. While she was here, I borrowed her phone to measure it up against the case. Guess what? It fits perfectly. One more Christmas gift sorted!

Monday 19 November 2012

Another day, another recipe

This is my husband's favourite recipe, but unfortunately I have been having an ongoing argument with our new oven and I am yet to win. The problem is that we switched from electric to gas, and I have learnt the hard way that good chocolate brownie needs a nice dry, electric oven. Something I no longer possess.

I have tried again today, but alas, it's still not "right". It is perfectly acceptable, in fact it's downright scrumptious but it's not how it used to be.

I'm beginning to come to the conclusion that we either need a new oven, or I need to accept this change to my beloved brownie. The new oven I fear, is a little too drastic even for me.

So, for those of you who are lucky enough to own the coveted electric oven, preset it now to 180c and grab a mixing bowl...


Chocolate Fudge Brownie:

100g dark chocolate chips
3 eggs
3 tbs low-fat cocoa powder
275g caster sugar
125g salted butter (at room temperature)
25g plain flour
50g self raising flour
0.5tsp vanilla extract


The method:


  • Preheat your electric oven to 180c and line/grease an 8 inch square cake tin.
  • Cream the sugar and butter together in a bowl until they are smooth and resemble creamy mashed potato.
  • Add the vanilla to the mixture.
  • Beat the eggs together in a cup/jug and add to the sugar/butter mixture, a little at a time.
  • Sieve the two flours and the cocoa into the bowl and mix together well.
  • Melt the chocolate chips and stir into the mixture until fully incorporated.
  • Pour into your tin and smooth over the top with the back of your spoon.
  • Bake for 35 minutes. The top with form a crust.
  • Allow to cool for 30 minutes before removing from the tin and placing on a rack to cool fully.
  • Slice and serve!

Obviously, feel free to give it a try in a gas oven. Every attempt I have made so far has resulted in a liquid, non-set centre, a burnt edge around the crust or a combination of the two. I have tried baking for longer at the same heat, baking for the same time at a higher temperature, baking for longer at a higher temperature. I am now running out of options!

I feel that what I need would require more brain cells than are resident in my skull. I need an inventor to create something to pop into my oven to take the moisture out of it. You counteract a dry elecrtic oven with a small dish of water in the bottom to add moisture, but how on earth do you remove that same moisture from a gas oven?

Sunday 18 November 2012

Playground etiquette

It has been a lovely sunny Sunday here on the south coast, and as such we decided that a trip to the local playground would be a good idea. Now, ordinarily we would have walked the mile or so, but as A had sustained a near-broken toe at the hands of his elder brother and a tent doorway (don't even ask!), we all piled into the car and headed park-ward.

It's not a big playground; a few swings, a climbing frame with slide and a rather ominous contraption of three hanging tires interlaced with a lot of rope and chain, all surrounded (or perhaps "embedded" would be more appropriate) with damp sand.

We pulled up to the park and spotted one other family, keeping themselves to themselves. Within minutes of the children leaping from the car, the park had been invaded by a waist-height army. Ok, I thought, we can deal with this. The boys tend to behave themselves very well in public (small mercies and all that!), the playground is flat and you can see the whole thing from any single point, there is a fence all around the parameter and an extra internal fence surrounding the swings. So, with the safety issues covered surely I could relax and enjoy our afternoon in the park.

Within seconds, or so it seemed, there was a child stuck at the top of the slide too fearful to commence his descent, another child had decided he must play in the sand barefoot but had come unstuck when his second sock would not come unstuck from his foot and a small fearless toddler of less than 2 years had made a break for it across the car park. Cries of "Mummy" reverberated around the playground from the two children in need of motherly assistance, as a shot a "they're not mine, whose are they?" look to another mother, who instinctively passed it onto a third. Luckily, from nowhere the tearaway toddler had been intercepted by his own mother.

Now comes the dilemma. Myself and my two fellow mother comrades have ascertained that the needy children do not belong to us, nor do they seem to be with the runaway child who is being loaded noisily into his car seat. I can easily reach down and help the child entangled in his own sock, but something akin to fear is stopping me. Fear that this child belongs to another woman, a woman I do not know, in fact at this point I am beginning to doubt her existence. If I were to help this child, I would have to make physical contact and society has now deemed that we cannot do that, as a stranger. As I am fighting with my inner need as a mother to help a child, I see the faintest movement across the park as one of my comrades does the same with hers. She is slowly, inch by inch, making her way towards the child on the slide whilst simultaneously scanning the surrounding area in hope that somebody would pop up like a Jack-in-the-box out of the sand and end her turmoil.

I managed to avoid the need for adult/child contact, as I had a light bulb moment and summoned F over to assist the poor child at my feet. The other poor mum however was left to gently manhandle a screaming child from shoulder height to the sandy floor, before quickly backing off and tending to her own child - perhaps in an attempt to demonstrate her mother credentials and her right to be in the play park.

Needless to say, our afternoon outing to the play park has left me more than a little confused. When did it become unacceptable to assist a fellow human being, regardless of age? Why is it now always a case of guilty until proved otherwise when one is stood within the confines of a children's play area? Think about it, and be honest with yourself, it's only when a child runs up to the lone man on the park bench yelling "Daddy" or "Grandad" that you breathe a sigh of relief that nothing sinister is going on under your very nose.

Obviously I want my children, and your children, to be safe. But every now and again you have to question how the world ever manages to evolve with so many constraints.


Saturday 17 November 2012

The Christmas crafting has begun

I know, I know, I'm a bit slow off the mark this year. I seem to have spent more time "pinning" ideas and not a single minute actually translating those ideas into actual, presentable articles.

We're on an economy drive this year and have vowed not to spend more than absolutely necessary, and yet still have a monumental Christmas. My first money saving gift idea comes in the form of homemade, personalised ceramic coasters. I struck lucky one day in B&Q and found a box of these 4" tiles reduced to £1 for 25 tiles! Combined with a 10 pack of coloured permanent markers from a pound shop, some felt to back the tiles with and 30 minutes in a super hot oven to seal them, I now have enough coasters for every adult in the family for the grand total of £3.50. Now that is penny pinching!!


And considering I'm not known for my drawing abilities, I'd say they turned out just about ok...


However, I have since found a much better method on Pinterest. Unfortunately the original blog post seems to have gone astray but all the instructions are right there on the Pin, so I'll keep my fingers crossed someday soon as I give it a go! If it turns out better, then I could always reuse the tiles that I have already decorated.

Friday 16 November 2012

Cow Appreciation Week and a little flapjack

Ever since an unfortunate close encounter between my 2 year old son and a rather hungry, rather vocal cow at a local animal centre, said son has been absolutely petrified of all things cow. So this week has been Cow Appreciation Week! I unfortunately do not have pictorial proof of the offending cow, but I will divulge that she is a resident of one of our much loved family attractions, The Rare Breed Centre. (In searching out that link, I have discovered not only a picture of the cow in question, but also a name - Luna.)

So, as part of CAW we have utilised YouTube and found a clip that A thinks is hilarious. It was the first thing cow related which didn't invoke an immediate response of "Don't crike it, Mummy." We've viewed more pictures via Google than I care to recall, poking the screen and "tickling" the cows to show that they couldn't hurt us. I've mooed at A, and in turn he has done his loudest moo at me. We've progressed from tears and cries of "Don't crike it, Mummy" at the mere mention of a cow to him asking to see pictures and videos, as well as randomly role playing as a cow. We have yet to revisit Luna, but give him time and I'm sure he'll come around to the idea!


To round off the week I used a line drawing of a cow which I printed and cut out. 


We had a good old delve through the craft boxes and came out with some fabric scraps that had been acquired some time ago from a pound shop. 


Out came the glue, and then A set to work making his patchwork cow. 


I know I'm his mummy, but considering he is only 2 years old, I think he did a fab job!


----------------------------

It would seem of late that my Fridays are not complete without baking up a little treat for the weekend; this week is flapjack.

To make my yummy flapjacks you need:

150g salted butter
75g soft brown sugar
4 tbs golden syrup
250g rolled oats
100g milk chocolate

The method:

  • Pre-heat your oven to gas mark 4. Line and grease an 8 inch cake tin.
  • Very gently heat the butter, sugar and golden syrup in a pan, stirring often until all of the butter has melted. Then remove from the heat.
  • Pour in the oats and coat completely with the lovely yummy runny mixture.
  • Press the mixture into the cake tin, right to the edges and use a silicon spatula to level the top.
  • Cook on gas mark 4 for 25 minutes. If you prefer it chewier then cook for an extra 3-4 minutes. Allow to cool on a rack (still in the lining paper).
  • Once the flapjack has cooled, melt your chocolate and coat as desired. My hubby likes the random, uneven coating so that's the way I have gone.
I specifically recommend mixing and pressing this mixture with a silicon spatula as I have found that less of the mixture sticks to it. A wooden spoon tends to cling to some of the mixture and you end up picking up more than you press down!

Admiring his work!

Pressed into the pan and ready to go into the oven.

Good enough to eat!